Repository
DETAILS: Tier: Free, Premium, Ultimate Offering: GitLab.com, Self-managed, GitLab Dedicated
A repository is where you store your code, make changes, and track changes using version control. Each project contains a repository and a repository cannot exist without a project.
Create a repository
To create a repository:
Add files to a repository
You can add files to a repository:
- When you create a project, or
- After you create a project, using the following options:
Add a file from the UI
To add or upload a file from the GitLab UI:
- On the left sidebar, select Search or go to and find your project.
- Go to the directory you want to upload the file to.
- Next to the directory name, select the plus icon ({plus}) > Upload file.
- Drop or upload your file.
- Enter a commit message.
- Optional. To create a merge request with your changes, in Target branch, enter a branch name that's not your repository's default branch.
- Select Upload file.
Commit changes to a repository
You can commit your changes
to a branch in the repository. When you use the command line, use git commit.
You can add multiple commits before pushing your changes.
-
Commit message:
A commit message identifies what is changed and why. Use descriptive messages to clarify the changes. In GitLab, you can add keywords to the commit message to perform one of the following actions:
-
Trigger a GitLab CI/CD pipeline:
If the project is configured with GitLab CI/CD, you trigger a pipeline per push, not per commit.
-
Skip pipelines:
Add the
ci skipkeyword to your commit message to make GitLab CI/CD skip the pipeline. -
Cross-link issues and merge requests:
Use cross-linking to keep track of related parts of your workflow. If you mention an issue or a merge request in a commit message, they are displayed on their respective thread.
-
-
Cherry-pick a commit:
In GitLab, you can cherry-pick a commit from the UI.
-
Revert a commit:
Revert a commit from the UI to a selected branch.
-
Sign a commit:
Add extra security by signing your commits.
Clone a repository
You can clone a repository using the:
- Command line:
- GitLab UI:
Download repository source code
When you download a repository's source code, it is compressed and saved as an archive file. To download the source code stored in a repository:
-
On the left sidebar, select Search or go to and find your project.
-
Above the file list, select Code.
-
From the options, select the files you want to download:
-
Source code:
Download the source code from the current branch you're viewing. Available extensions:
zip,tar,tar.gz, andtar.bz2. -
Directory:
Download a specific directory. Visible only when you view a subdirectory. Available extensions:
zip,tar,tar.gz, andtar.bz2. -
Artifacts:
Download the artifacts from the latest CI/CD job.
-
The checksums of generated archives can change even if the repository itself doesn't change. For example, this occurs if Git or a third-party library that GitLab uses changes.
Repository languages
GitLab detects programming languages used in the default branch. This information is displayed on the Project overview page.
When new files are added, this information can take up to five minutes to update.
Add repository languages
Not all files are detected and listed on the Project overview page. Documentation, vendor code, and most markup languages are excluded. To view a list of supported files and languages, see supported data types.
To change this behavior and include additional file types in the default settings:
-
In your repository's root directory, create a file named
.gitattributes. -
Add a line that tells GitLab to include a specific file type. For example, to enable
.protofiles, add the following:*.proto linguist-detectable=true
This feature can use excessive CPU. If you experience an issue, see the Repository Languages: excessive CPU use troubleshooting section.
Repository size
- Introduced in GitLab 15.3, feature flags
gitaly_revlist_for_repo_sizeandgitaly_catfile_repo_sizefor alternative repository size calculations.
FLAG:
On self-managed GitLab, by default GitLab uses the du -sk command to determine the size of a repository. GitLab can use either
git-rev-list (enabled with feature flag gitaly_revlist_for_repo_size) or git-cat-file (enabled with feature flag
gitaly_catfile_repo_size) instead. To switch between different calculation methods, an administrator can
enable or disable these feature flags.
The Project overview page shows the size of all files in the repository. The size is updated every 15 minutes. The file size includes repository files, artifacts, and LFS.
The size can differ slightly from one instance to another due to compression, housekeeping, and other factors. Administrators can set a repository size limit.
GitLab sets the size limits for GitLab.com. For more information, see Account and limit settings.
Repository contributor analytics
You can view a line chart with the number of commits to the selected project branch over time, and line charts with the number of commits by each project member. For more information, see Contributor analytics.
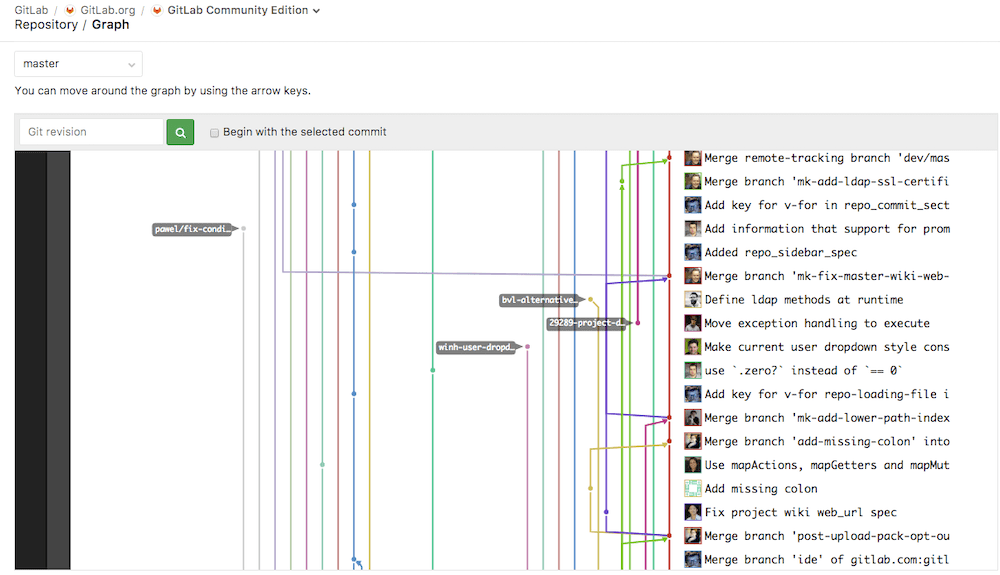
Repository history graph
A repository graph displays a visual history of the repository network, including branches and merges. This graph can help you visualize the Git flow strategy used in the repository.
To view the repository history graph, go to your project's Code > Repository graph.
Repository path changes
When a repository path changes, GitLab handles the transition from the old location to the new one with a redirect.
When you rename a user, change a group path, or rename a repository:
- URLs for the namespace and everything under it, like projects, are redirected to the new URLs.
- Git remote URLs for projects under the namespace redirect to the new remote URL. When you push or pull to a repository that has changed location, a warning message to update your remote is displayed. Automation scripts or Git clients continue to work after a rename.
- The redirects are available as long as the original path is not claimed by another group, user, or project.
- API redirects may need to be followed explicitly.
After you change a path, you must update the existing URL in the following resources:
-
Include statements except
include:component, otherwise pipelines fail with a syntax error. CI/CD component references can follow redirects. - Namespaced API calls that use the encoded path instead of the numeric namespace and project IDs.
- Docker image references.
- Variables that specify a project or namespace.
Related topics
- GitLab Workflow extension for VS Code
- Lock files and prevent change conflicts
- Repository API
- Files
- Branches
- Create a directory
- Find file history
- Identify changes by line (Git blame)
Troubleshooting
Search sequence of pushes to a repository
If it seems that a commit has gone "missing", search the sequence of pushes to a repository.
This StackOverflow article
describes how you can end up in this state without a force push. Another cause can be a misconfigured
server hook that changes a HEAD ref in a git reset operation.
If you look at the output from the sample code below for the target branch, you
see a discontinuity in the from/to commits as you step through the output.
The commit_from of each new push should equal the commit_to of the previous push.
A break in that sequence indicates one or more commits have been "lost" from the repository history.
Using the rails console,
the following example checks the last 100 pushes and prints the commit_from and commit_to entries:
p = Project.find_by_full_path('project/path')
p.events.pushed_action.last(100).each do |e|
  printf "%-20.20s %8s...%8s (%s)", e.push_event_payload[:ref], e.push_event_payload[:commit_from], e.push_event_payload[:commit_to], e.author.try(:username)
end ; nil
Example output showing break in sequence at line 4:
master f21b07713251e04575908149bdc8ac1f105aabc3...6bc56c1f46244792222f6c85b11606933af171de root
master 6bc56c1f46244792222f6c85b11606933af171de...132da6064f5d3453d445fd7cb452b148705bdc1b root
master 132da6064f5d3453d445fd7cb452b148705bdc1b...a62e1e693150a2e46ace0ce696cd4a52856dfa65 root
master 58b07b719a4b0039fec810efa52f479ba1b84756...f05321a5b5728bd8a89b7bf530aa44043c951dce root
master f05321a5b5728bd8a89b7bf530aa44043c951dce...7d02e575fd790e76a3284ee435368279a5eb3773 root
Error: Xcode fails to clone repository
GitLab provides an option to restrict a list of allowed SSH keys.
If your SSH key is not on the allowed list, you might encounter an error like
The repository rejected the provided credentials.
To resolve this issue, create a new SSH key pair that meets the guidelines for supported SSH key types. After you generate a supported SSH key, try cloning the repository again.